(Not so) Quick Guide to…Wound Management.
| April 11, 2022 | Posted by Melinda under Uncategorized |
- Disclaimer: This is not a comprehensive article with all the background information needed to treat or evaluate wounds and I am not providing medical advice. This is simply here for your enjoyment and entertainment. These little guide to posts (yes, I hope that I’ll be doing more than one of these) have more holes than a pair of fish net stockings. So as long as we play nicely and take these as they are intended as “look at this cool vetmed stuff,” we will all get along.
There are 6 basic types of messed up skin.
Abrasions: Something got scraped.
- Hurts like a SOB but some how we talk about “scrapes and bruises” as if they are something to be shaken off. Of course, after reading through this list you may decide in the game of “would you rather” abrasions may be higher on your list than what’s coming up.
Punctures: Something got poked.
- Key point about penetrating objects. Don’t. Pull. The. Thing. Out. Leave it there. Yes, I know it bothers you and you are all squeed out and if you pull it out maybe you can pretend it all didn’t happen. Don’t. Do. It. Yes, I know it’s a branch the size of a small tree that has skewered your dog/horse/other suicidal animal….but leave it there. You will be sorry if you pull it out. Trust me. Same goes for nails in the hoof. The puncture wound is the tip of the iceberg.
Lacerations: Something got cut or torn.
- There’s something so…civilized about the word laceration. Stabbed, shredded, cut….all those words bring shivers to my soul. Laceration? Sounds like something you could accidentally do while drinking tea and talking about the weather.
Degloving: The skin got peeled (ripped? what sounds more awful?) off an area of the flesh like a….glove.
- I suggest you don’t start googling.
Thermal: Something got burned.
- Is it just me or is it just getting worse as we go down the list?
Decubital ulcer: *???*
- I’ll save you the google search and perhaps having to sterilize your eyeballs. Evidently this is what the doctor-ey types like to call pressure sores.
Great. You have a wound and it needs healing. What do you do next?
Clean the bejeezus out of it and find your suture kit
The correct answer is….stabilize the patient.
KEY CONCEPT IN WOUND MANAGEMENT: Stabilize the patient. Did I say it loud enough for the people in the back to hear me? Stabilize. In same cases that may mean pressure to stop bleeding or tourniquets. But, most of the time stabilizing means covering the wounds to protect them, and then treating shock, warming up your patient, and addressing their pain.
Why?
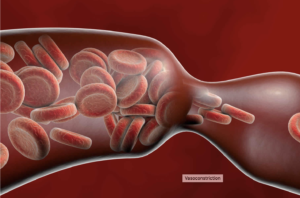
Ignoring the bit that shock can kill, and while wounds hurt like a SOB, most of them are not immediately life-threatening …the biggest problem with being cold, being in shock, and being in pain is vasoconstriction.
Having the blood shunt away from the wound, skin, and extremities is a good thing when various things get forcibly removed from your body and affected vessels are trying to clot.
But, the downside to vasoconstriction is that there’s less blood being delivered to the wound. Less oxygen to wound = slower healing.

This graphic is based on heat loss that occurs with vasodilation…but imagine the arrows are for oxygen delivery to the epidermis.
Once the patient attached to the wound gets taken care of, we can get to the fun stuff…..what are we going to do about all the squishy bits peeking through the skin?
First, you gotta clean it, remove the bad bits, and completely explore.
It’s this triad of things that must happen that makes me shake my head when people ask if they should put suture packs in their first aid kit.
No.
It’s not because I don’t want you to look super cool stitching something up during the zombie apocalypse. It’s because without doing these three things first, your wound repair is guaranteed to fail and end off worse than it started.
The importance of these three things is where the biggest mistakes in wound management occur, and is also the reason it’s hard to address major wounds without the help of a vet. Besides the stabilization part (which often requires IV shock fluids and sometimes other drugs to maintain blood pressure), it’s really hard to debride and explore a wound fully without sedating or inducing general anesthesia. Occasionally I can get it done with just some good pain meds (which are also sedating), but that’s the exception and not the rule.
These three things are the bedrock of your future wound management success. In real life all three things are happening concurrently, but let’s take them one by one and talk about the biggest mistakes that happen.
Clean it (the flushing part)
Irrigate, irrigate irrigate. Volume is important, sterile water and antiseptics are not. I often tell horse people that the garden hose is their best friend to flush and manage wounds. To those of you that know me in real life….I know about the behind my back eye rolls when I say “dilution is the solution to pollution” for the thousandth time.
Biggest mistake #1: Using high pressure. There are actually specific guidelines for irrigating wounds such as “a 35 ml syringe with an 18 gauge needle produces blah blah units of pressure and is recommended blah blah blah.” In large animals especially, turn on the garden hose, but for God’s sakes don’t go looking for some sort of pressure nozzle. High pressure damages the surrounding tissues. You don’t actually heal the wound. The patient does. And it needs all the healthy tissue around the wound to make it happen.
Biggest mistake #2: Using antiseptics. Ok ok ok….this isn’t a mistake, and if properly diluted the antiseptics probably won’t cause harm at this stage……but they also have dubious efficacy at this stage. Honestly, you are better off with a garden hose and focusing your energy on volume of irrigation. If it’s a contaminated or old wound the bacterial contamination will be addressed later on anyways. If you do want to use an antiseptic, make sure it’s properly diluted and choose something gentle on surrounding tissues.
Bonus for taking the time to throughly flush and clean wounds: It’s a great time to get all the panics out, all while looking like you know what you are doing because you are doing something.
Explore it (the poking part)
Just how big is that wound?
Biggest mistake #3: Not fully exploring the wound.
What you see is what you get is sometimes true, but in most cases the damage to the tissues goes on and on and on…unseen from the surface. You can’t assume. You have to explore. It’s amazing just how bad something can be from an innocuous looking tiny hole on the surface of the skin.
You gotta know what you are dealing with before you can make a good plan.
Debride it (the cutting and scraping part)
What can stay and what needs to go?
Surgical debridement – this means removing tissue sharply at presentation – is an excellent way to start wound management. Using a sharp scalpel I cut out all the bad tissue that is grossly contaminated or going to die anyways. When I’m done hacking and slicing I have a clean wound with healthy tissue that is ready for the next step.
Depending on the exact circumstances there are non-surgical debridement options too. This means applying something to the wound that will remove the bad tissue without me cutting it out.
There’s some overlap between exact categories of non-surgical debridement, but here’s some examples:
Autolytic/non-enzymatic: The most common non-surgical debridement I use in vetmed is honey or sugar/sugar-dine (mixing white table sugar with betadine). The other option is a hydrogel or hydrocolloid dressings which form a gel when they come into contact with the moisture the wound is shedding. This sounds really cool (and less messy than honey), but the dressings are more expensive, so it is a lot more common to see honey or sugar to manage wounds in the vetmed setting. Either way the goal for this type of debridement is to create a moist wound environment where the body’s own mechanisms can dissolve and chew away at the “bad” wound bits.
There’s a type non-surgical debridement called enzymatic, which includes collagenase ointment. I think there’s only one product approved in the US as an enzymatic wound dressing. I’ve never used it and I’ve never seen it stocked in a vet clinic. *shrug*
Biologic: Leeches! Although a lot of sources call this “larval debridement” or “Hirudotherapy” since apparently leeches has negative connotations among patients that can talk back to their docs.
Sugar and honey (manuka, which is a medical grade honey that has better antimicrobial properties than other honeys) are all the rage right now, but it’s important to choose a debridement and dressing option that is a good match for the wound in front of you. Other than cost and using what is in your wound care drawer, one important thing to consider is matching the thing you are putting on top of the wound, to the amount of fluid that the wound is producing. Honey or sugar may be good for wounds that have little to moderate amounts of exudate….but if you have a wound that is highly exudative and is constantly soaking through the bandages, it’s time to consider a different option. Things like Calcium Alginate (a seaweed derivative) or a hydrogel dressing might be a better choice to soak up all that liquid while still leaving the wound bed nice and moist.
NICE AND MOIST. That is the key to good wound management. There are these types of bandages that I learned about in vet school and still occasionally see in clinics called wet-to-dry bandages. Basically, you take a very wet moist exudative wound that needs debridement, so you apply a bandage on that is dry. The wet wound will soaks through, and then you rip that whole thing off in a day or so, thus removing a whole lot of tissue in one go, leaving (theoretically) a nice debrided wound bed that is ready for the next healing step.
Besides being painful, this type of bandage debrides everything indescrimately.
This isn’t standard of care anymore.
Just don’t.
Standard of care is MOIST wound bed management.
When you know better, do better.
If choosing to debride a wound non-surgically, or in addition to surgical debridement, this usually means not closing the wound right away.
“Wait a minute….if we are applying stuff and changing bandages….how do we suture it closed?” Excellent question. We’ve come to the point in the wound management that we need need to create a plan for how we are going to close (or not) the wound.
Make a Plan
Is the defect small enough and recent enough (such as a smaller puncture wound) that I can remove the entire wound “en bloc” and close surgically, sorta like removing a small tumor?
Is the laceration clean enough and recent enough that I can surgically debride a few minor layers and edges and then close like a surgical wound?
These are examples of “primary wound closure,” sorta like a regular surgical incision. At the time of treatment we suture it together and voila! wait a couple of weeks and you are all done with just a small amount of scar tissue. This kind of wound closure is probably what most people expect when they bring me a wound. Fix it doc!
Trust me, this what the vet prefers too. We would really really like to fix your problem today and send you onto your happy life with a nice little suture line that will heal into a nice little line of scar tissue.
But………
Biggest mistake #4: Trying to turn every wound into a primary closure. Closing something that you know is going to fail.
The problem is….this is not a good plan for many wounds.
- Most big dirty wounds need substantial layered debridement.
- Maybe it isn’t possible to fully surgically debride the wound and we need to use one of the autolytic techniques we talked about above.
- There might already be pus and infection.
- Or, big chunks of dead tissue that have to be cut away leaving a huge, gaping defect in the skin. Pulling the edges of the tissue back together under tension is a recipe for failure. Part of the normal healing process is contraction of the skin and tissues. If we pull those that skin together under tension, that skin is going to rip apart again and doom the repair to failure.
- Or maybe you have a degloving where the skin is completely gone (I told you not to google).
- Or, a wound such as a thermal or amputation injury where it’s not clear where the good tissue starts and the dead tissue is, and it will evolve over a period of time.
Fortunately, not being able to close a wound right away does not mean failure. It just means a different plan.
Instead you can…..Leave the wound open.
Yes, really.
Keep it moist, keep it protected, and support the body in getting rid of infection, filling in chunks of missing tissue, and creating new skin over the top.
There’s three basic variations.
The first two options are similar but the timing is different.
Delayed primary closure: Manage it as an open wound for 3-5 days, then close it by bringing the skin edges together. This is an excellent plan for wounds that have some pus or infection. Get rid of that infection first, then close it to finish healing a couple of days later.
Or, leave it open for more than 5 days….then close it (Secondary closure). This is really helpful for wounds that have a big hole. If you close it too early fluid will accumulate, and healing will take longer. Keeping the skin open means you can monitor what is happening and control what it’s doing. Once the hole has filled in and the wound bed looks like and healthy, bring the edges together and stitch ‘er up.
–> Advantage of delaying closure: Get rid of excessive bacteria and infection before closing! Manage the wound bed to so that it’s clean and has minimum of dead space. The ability to apply medication to help manage. But, still get the advantage of closing the skin edge to edge for minimal scar tissue, contraction during healing, and shorten the length of healing.
–>Disadvantage: Multiple treatment visits and increased costs since not everything can be addressed at once.
The third option is open wound management, letting the body heal the defect by creating new skin/scar tissue over the top. This is called “Second intention closure.” Think about the big scars you have seen on horses that are puckered and distort the skin around them. That tightening down of the healing skin is a result of contraction – a feature of this type of healing. The hairless scar tissue over the top of these healed wounds is also a result of leaving the body to deal with an open wound. The body does this amazing process of actually creating new skin cells that migrate and move across the raw wound bed and grows new skin. It’s freaking amazing when you think about it.
Main things to remember about choosing this type of wound management.
–> It takes forever.
–>contraction of the tissues around the area will absolutely happen. This isn’t a big deal on some parts of the body (like the rump). May be a huge deal on a different part of the body (like a limb, or a tail).
–>May be cheaper upfront….but the care goes on and on and on.
–> A larger area of scar tissue will be present at the end. Scar tissue is not as strong as the normal tissue it replaces.
Biggest mistake #5. Not having a plan beyond “let’s clean and yank the skin back together and stitch it together and hope for the best. This is where I think vets fail the most in wound management. They don’t have a plan. Or at least, they don’t write down the plan.
Drain, bandages, and dressings…oh my!
To wrap up this post, here’s a few other details that I just can’t leave out a post about wound management, even if the “quick guide” is already 3000+ words.
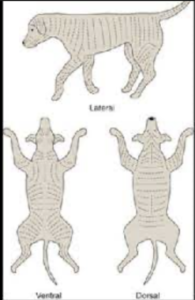
Tension Lines
There’s this thing called tension lines in the skin. Pay attention to tension lines, which are approximately oriented like zebra stripes, because they will tell you how you should orient closure to have the least chance of your suture lines failing.
Drains
I hate drains. I avoid them where possible. But if there is a big pocket where fluid will accumulate, I think about putting a drain in. Fluid accumulation delays healing. I’m either going to have to put a passive drain (ugh), think about whether I think the patient and owner can handle an active drain, or tack down tissue layers (not always possible).
Biggest mistake #6: badly placed drains–> through and through, not bandaging, not taking down the free end, and using them as a substitute for a comprehensive management plan. Instead, the plan is “close everything as a primary closure, stick a passive drain in there for good measure, and then deal with the wound later if it doesn’t stay together.” Uhhhhhhh…..
To bandage or not bandage.
Decide what the point of the bandage is, and choose something that fulfills the purpose.
Protect the wound?
Protect the owner’s sensibilities?
Reduce movement? (a splint might be needed instead of a soft bandage)
Protect a drain?
Dressings
Beyond the debridement dressings described above, there’s other reasons to apply dressings to wounds
- Fly control
- Make the owner feel good
- Make the pet feel good
- Provide some topical antiseptic
- Protect the wound
- Control granulation tissue growth
- Encourage and support the current healing stage – for example encouraging granulation tissue to form during proliferation stage, or encouraging epithelization once it’s time for the pet to create new skin over the wound.
Horse owners LOVE their wound dressings. Remember that the important thing is to keep the wound bed moist, don’t damage the wound bed, and support whatever stage the healing is in. Tradition isn’t the best guide, a little research and common sense is.
Expectations
Wound management is usually NOT a one and done.
Biggest mistake #7: Not preparing the client (or yourself) well enough for what could be a long process. You really really really want to save that leg? Are you willing to do multiple sedated bandage changes at the clinic a week for a month? Maybe we should just amputate. Turn that big open degloving wound on the leg into a simple surgical incision after removing the leg.
Realistic, honest conversations need to happen now, at the beginning of the process, with a full disclosure that there are a number of things we can’t control, one of them being a patient who is not going to read discharge instructions.
In Conclusion
There’s a few common principles that apply to most wounds, but the exact plan will be tailored to the unique nature of the wound (location, how long ago, type, contamination, cause etc.), the unique patient characteristics (aggressive, active, secondary medical conditions, age), and client motivation (money, time and energy).
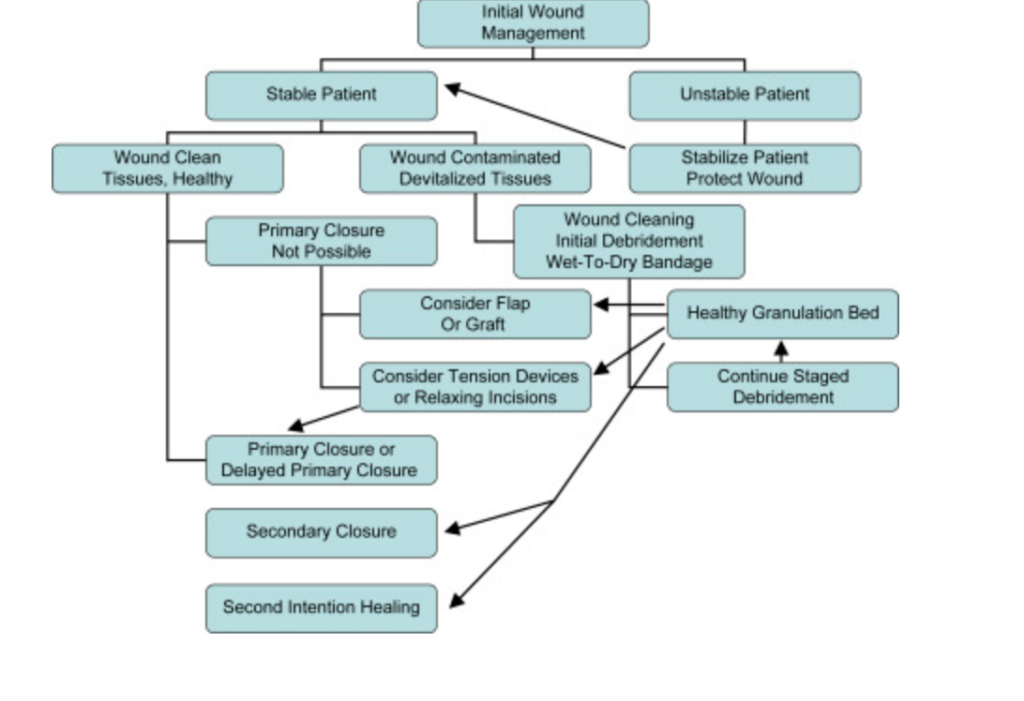
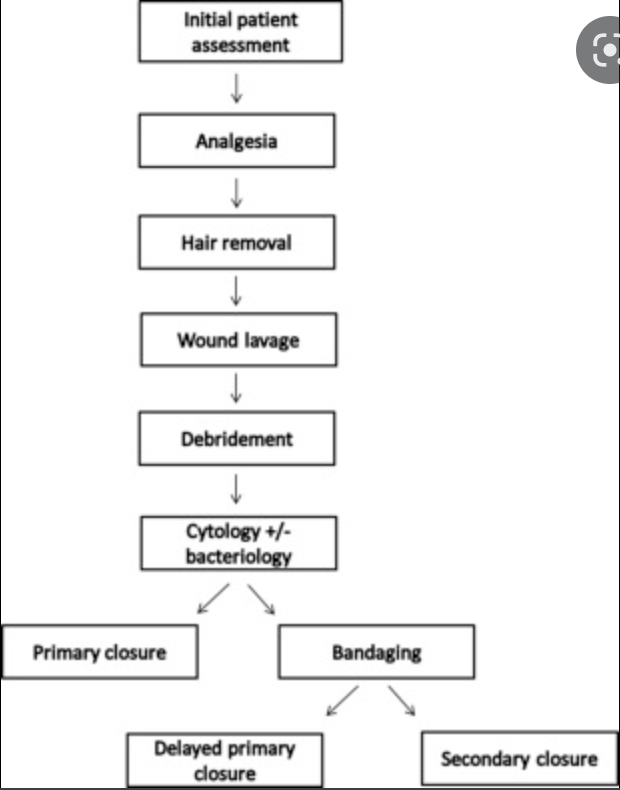
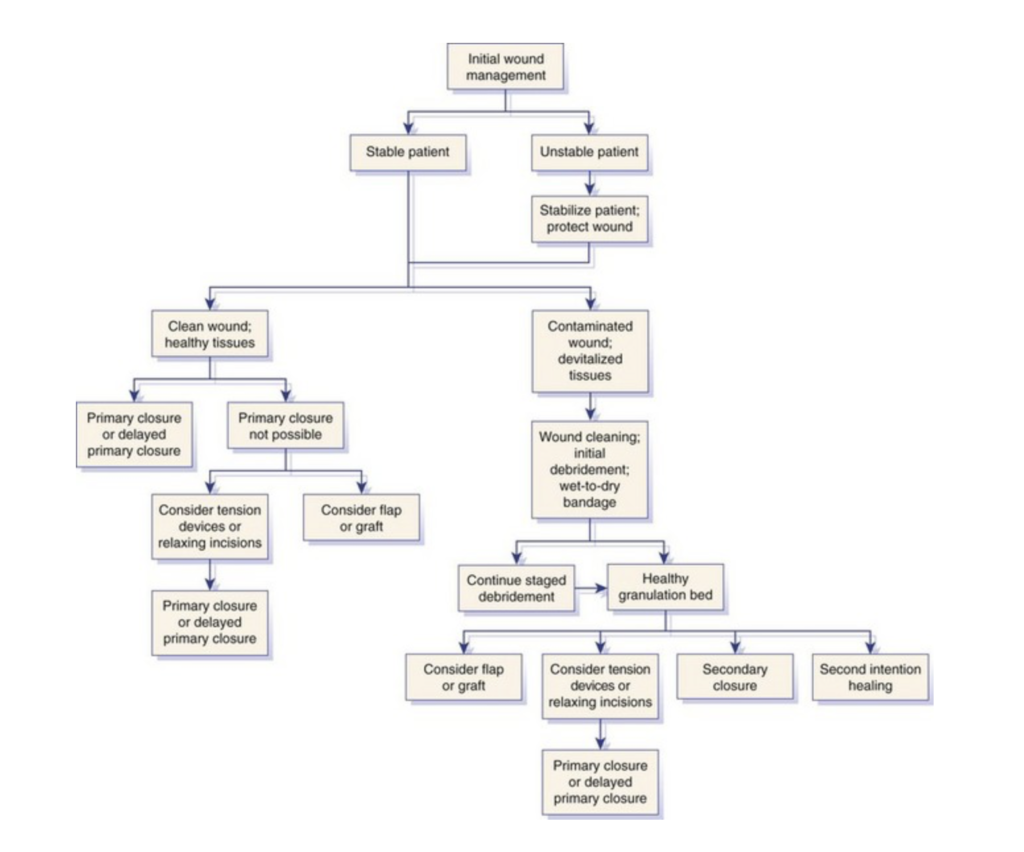
Finally, here’s a selection of wound related algorithms available. None of them get it completely right IMO…but that’s one of the things about wound care – there are multiple paths and a bit of creativity needed. This is where medicine feels a lot more like art with a bit of science thrown in.


